Is Your Cat Slowing Down? It Might Be More Than Just Aging

A guide to degenerative joint disease in cats — from the team at East End Veterinary Hospital

When your cat starts sleeping more, jumping less, or seems grumpy when you try to pet them, it’s easy to chalk it up to getting older. But in many cases, there’s something more specific going on — and it has a name: degenerative joint disease, or DJD.


What exactly is DJD?

Your cat’s joints are remarkably well-engineered. Where two bones meet, smooth cartilage covers the ends of each bone, and the joint is bathed in lubricating fluid — all designed to allow effortless, friction-free movement.

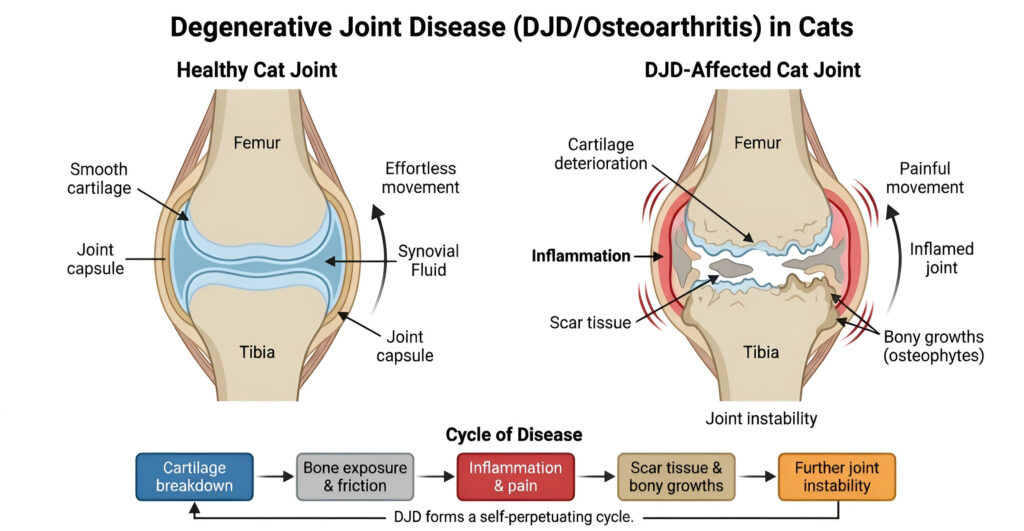
DJD (also called osteoarthritis) is what happens when that cartilage slowly breaks down over time. As the cushioning deteriorates, the bones lose their smooth gliding surface. The joint becomes inflamed, painful, and unstable. The body responds by forming scar tissue and bony growths in an attempt to stabilize things — but this actually makes the problem worse, creating a cycle that’s difficult to reverse.


How common is it?

More common than most people realize. Studies have found that 22% of cats over one year old show evidence of DJD on X-rays — and that number jumps to 90% in cats aged 12 and older. The joints most frequently affected are the hips, knees, ankles, and elbows.

Overweight cats are at higher risk, both because of the extra mechanical load on their joints and because obesity itself drives low-grade inflammation throughout the body.


The signs are easy to miss

Unlike dogs, cats with arthritis rarely limp or cry out in pain. Instead, the signs are subtle — and often mistaken for normal aging:

  • Jumping up or down less than they used to (or refusing to altogether)
  • Sleeping more / seeming less interested in moving around
  • Increased grumpiness or irritability, especially when touched near the affected joints
  • Morning stiffness
  • Neglecting grooming or avoiding the scratching post
  • Difficulty getting in and out of the litter box

Not every cat shows every sign, which is part of why DJD is so often overlooked.


What can be done?

The damage from DJD can’t be undone, but there’s a lot that can be done to keep your cat comfortable and slow the progression.

Environmental changes are a great starting point and cost nothing. Adding a step or ramp to favourite perching spots, switching to a litter box with lower sides, placing food and water where your cat doesn’t have to strain to reach them — small adjustments like these can make a real difference in daily quality of life.

Pain management is usually central to treatment. Options your veterinarian may discuss include:

  • NSAIDs like meloxicam (Metacam®) or robenacoxib (Onsior®) to reduce joint inflammation
  • Solensia®, a newer injectable antibody treatment that blocks pain signals between the joint and the brain
  • Gabapentin for nerve-related pain, often used alongside other medications
  • Amantadine, which enhances the effect of other pain relievers

One important note: never give your cat human pain relievers. Even a single acetaminophen tablet can be fatal to a cat. Always check with your vet before giving any medication.

Nutritional support can also help. Therapeutic diets (like Royal Canin Mobility Support or Hill’s j/d) are designed specifically for arthritic patients. Supplements such as omega-3 fatty acids, undenatured type II collagen (Flexadin Advanced®), and green-lipped mussel (Antinol®) all have evidence supporting their use in cats with DJD. Glucosamine and chondroitin are widely used as well, though the evidence base for cats is still developing.

Rehabilitation therapy — including laser therapy, hydrotherapy, and acupuncture — is a growing part of veterinary care and may be an option worth exploring for cats with significant arthritis. Some specialty practices also offer stem cell therapy and platelet-rich plasma (PRP) injections.


When to come in

If your cat is showing any of the signs above — especially if they’re getting on in years — it’s worth having them assessed. A physical exam and X-rays can help us determine whether DJD is involved and how advanced it is. From there, we can put together a plan that fits your cat’s specific situation.

Give us a call at 709-401-1121, email info@eastendvethospital.ca, or book online.


How to Apply Ear Medication to Your Dog

A step-by-step guide from the team at East End Veterinary Hospital

If your dog has been prescribed ear medication, you might be wondering how to make the process go smoothly at home. The good news is that with a little patience and the right technique, most dogs can learn to tolerate — and even accept — ear treatment without too much fuss.

Here’s everything you need to know before you get started.


A Few Things to Keep in Mind

Ear infections and other ear conditions can be surprisingly painful. Even the gentlest, most easy-going dog may react by struggling, growling, or trying to bite or scratch when their ears are touched. This isn’t bad behaviour — it’s a pain response, and it’s completely understandable.

Be patient, go slowly, and if your dog is clearly distressed, don’t hesitate to use a muzzle until the medication starts to bring some relief. Always read the drug label carefully and make sure you understand the dosing instructions before you begin. If anything is unclear, give us a call.


Tips for Making It Easier

A little preparation goes a long way:

  • Warm the medication first. If it’s been stored in the fridge, roll the bottle between your palms for a minute before applying. Cold drops in a sore ear are never fun.
  • Build positive associations. Show your dog the ear medication bottle several times a day and follow it with a treat or some affection — before you even need to use it. You’re teaching them that the bottle means good things.
  • Practise gentle ear handling daily. Regularly massage your dog around the neck and ears, occasionally lifting the ear flap. This helps them learn that ear touching is normal and safe.
  • Ask about pain relief. If your dog is really struggling, let us know. Additional pain medication can make the whole process much easier for everyone.
  • Understand the anatomy. A dog’s ear canal is L-shaped. Pulling the ear flap gently upward straightens the canal and helps medication flow where it needs to go.

Step-by-Step: How to Apply the Medication

Before you begin, confirm with your veterinarian whether the bottle or syringe tip can be placed directly into the ear canal, or whether it should be held above and dripped in. This matters for how you apply it.

1. Prepare the medication. Shake the bottle well, then draw up the prescribed amount into a syringe or dropper if needed.

2. Get into position. Find a quiet spot away from other pets and household distractions. How you position your dog depends on their size:

  • Large dog: Have them sit with their rear end in the corner of the room, one side against the wall. Stand on the open side.
  • Medium dog: Sit on the floor with your dog sitting in front of you, rear end tucked between your legs.
  • Small dog: Sit them comfortably in your lap.

3. Start with some ear love. Spend a moment rubbing around your dog’s head and ears. Most dogs genuinely enjoy this, and it helps them relax before you get to the treatment part.

4. Hold the ear flap. With your non-dominant hand, gently but firmly grasp the tip of the ear and pull the flap straight up. This exposes the ear opening and straightens the L-shaped canal.

5. Apply the medication.

  • If the bottle is designed to go into the ear: Gently insert the tip straight down into the canal and dispense the prescribed amount.
  • If the bottle should not touch the ear: Hold the ear up as described, then squeeze the dropper so the medication falls into the canal opening.

6. Massage the base of the ear. Once the medication is in, gently massage the base of the ear — just below the ear opening — for about 30 seconds. You should hear a soft squishing sound as the medication works its way through the horizontal part of the canal. That means it’s getting where it needs to go.

7. Treat the ear flap if needed. If the infection involves the inner surface of the ear flap itself, apply the prescribed amount of medication to that area and spread it gently with a gloved finger.

8. Clean the tip. Wipe the tip of the bottle or syringe with a clean cotton ball moistened with rubbing alcohol. This helps prevent the spread of bacteria or yeast between treatments.

9. Wipe away any excess. If medication or debris accumulates on the flap, wipe it away with a cotton ball dampened with ear cleaning solution. Your dog will probably shake their head at this point — that’s completely normal.


Don’t Forget the Reward

Give your dog plenty of praise throughout the whole process, and offer a treat during and after. The more consistently you pair ear treatment with something enjoyable, the easier it will get over time.


When to Call Us

If your dog is resistant to ear treatment despite your best efforts, please reach out to our team. There may be alternatives worth exploring, or your dog may benefit from additional pain management to make the process more comfortable.


Taking the Stress Out of Your First Vet Visit: A Guide for New Pet Owners

Bringing a new furry friend into your life is such an exciting and heartwarming journey! While it’s easy to get wrapped up in the joy of cuddles and playtime, there’s one important task that deserves your attention: scheduling your pet’s first visit to the veterinarian. This significant milestone lays the groundwork for a lifetime of good health and happiness, and with just a bit of preparation, you can make the experience smooth and enjoyable. Here’s your handy step-by-step guide to ensure that first vet visit is a breeze:

  1. Book Ahead
    Avoid waiting until your pet isn’t feeling well to make a vet appointment. Veterinary clinics often have busy schedules, especially for new patient exams. By calling in advance to book your appointment, you’ll give yourself plenty of time to prepare and ensure your furry friend gets the timely care they truly deserve.
  2. Prepare a Pet “Go-Bag”
    Think of this as packing a mini suitcase just for your pet! Having the right items ready will help make the visit more efficient and less stressful. Here’s what to include:
    • Adoption or purchase paperwork: This helps establish your pet’s history.
    • Medication list: Bring details of any supplements or preventive care your pet is currently on.
    • Questions for the vet: Take a moment to jot down any concerns or curiosities ahead of time.
    • Treats: A little bribery can create a positive association with the vet!
    • Personal ID: Always handy in case of an emergency.
    • Medical records: Any documentation from shelters, breeders, or previous owners is incredibly valuable.
  3. Practice Makes Perfect
    If your pet is new to car rides or being handled by strangers, give them some time to acclimate. Taking short trips in the car can help reduce anxiety, and practicing gentle handling will make the veterinary examination feel less intimidating.
  4. Consider Pet Insurance
    Unexpected vet bills can surprise even the most experienced pet owners. Take some time to research and compare pet insurance policies to find one that fits your pet’s needs and your budget. With financial peace of mind, you can focus on your pet’s well-being without any worries.
  5. Know What to Expect
    Understanding what typically happens during a first vet visit can help you feel more confident:
    • Paperwork: Be ready to share details about your pet and your contact information.
    • Physical exam: The vet will perform a thorough examination to assess your pet’s overall health.
    • Vaccinations: Your pet will likely receive essential vaccines to protect them from common illnesses.
    • Q&A session: Use this time to ask questions and discuss your pet’s care plan.

By following these steps, you’ll help establish a positive relationship between your pet and their vet. Remember, taking a proactive approach to health care paves the way for a lifetime of happiness and companionship with your precious new friend!